

With parent-teacher conferences just around the corner, why not use technology to help you schedule conference time slots? Calendly is an online tool that can help you do this. Click on the free sign up button and sign up with your district Google account. Then you won't have to remember an additional password.
Free Account Limitations
Your premium account lasts for the first 14 days, just long enough to get parents signed up for 10 or 15-minute time slots. The free Calendly account allows users to use one specific "Event Type" (or time block). This means one specific amount of time for the time blocks (example: 10 minutes or 15 minutes). The free account forces you to stick with that amount of time for all subsequent appointments. With this background information out of the way, here is how it works:
Event Types
First, you will set your availability preferences. Using your 14-day Premium account, you will have access to more than one Event Type length. After that point, you are downgraded to just one event type time, but you can still create as many dates as you want with that same duration.
You will start by clicking Event Types on the top menu bar. Then, as you can see from the picture below, you can either turn On or turn Off the different Durations (10 minutes, 15 minutes, 30 minutes, 1 hour, etc.). For Parent-Teacher Conferences, you may find it easier to just click the "Add event type" button in the top right corner and create your own customized event type. You will get a choice of "One-on-One" (such as a conference) or "Group" (such as a webinar or an online class). I created a one-on-one event type called Parent-Teacher Conferences and I made the duration 10 minutes. You will choose an "Event Link" such as calendly.com/[username]/conferences
This is the link that parents can use to see your available time slots. Other choices include "Add/Edit Questions for Invitee" and you should add a custom question such as "Your son/daughter's name," since this question is not included by default. An E-mail address question is not necessary, since that field is automatically included when parents fill out your form.
This quick video shows how to create the sign-up sheet for parents to use, clearly showing each of the steps below.

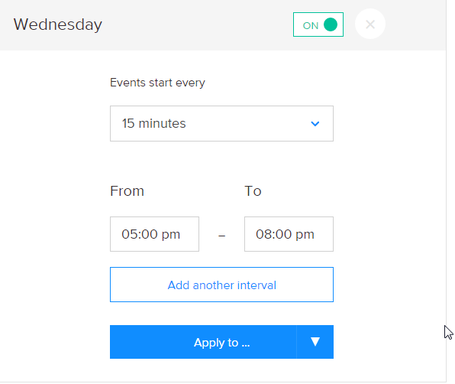
Availability and Intervals
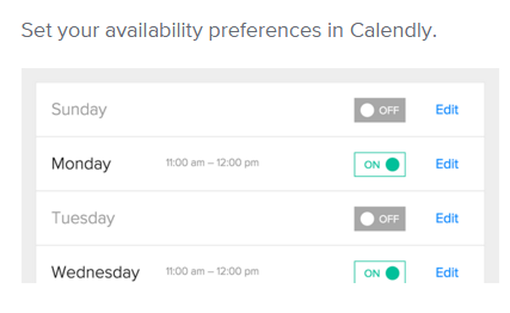
As you scroll down the choices, you will come to the Availability section, with various days and times. You should turn Off each day and time that doesn't apply to the Parent-Teacher Conferences, leaving only the days and times when you are available.
As you scroll down the choices, you will come to the Availability section, with various days and times. You should turn Off each day and time that doesn't apply to the Parent-Teacher Conferences, leaving only the days and times when you are available.
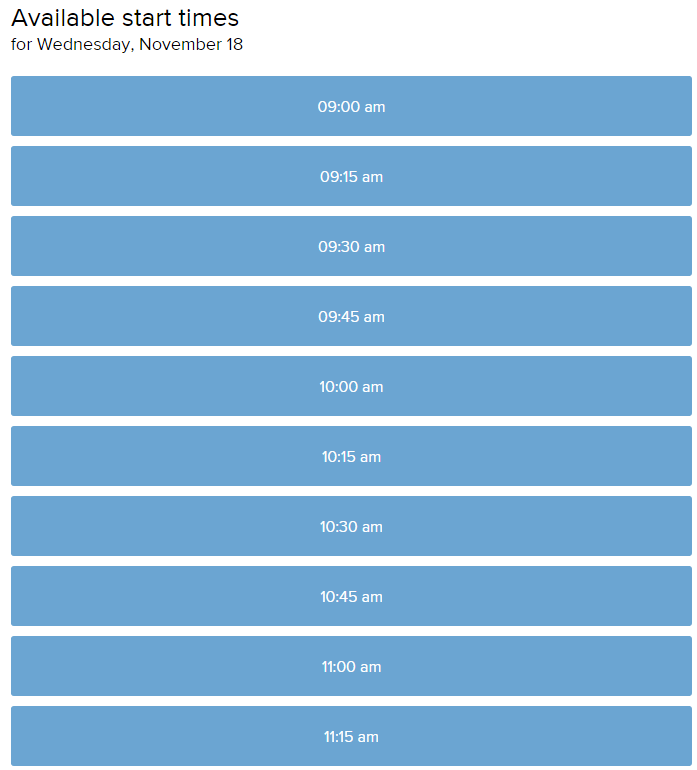
Here is an example of a Wednesday night conference schedule where I use an interval, so that a different conference starts every 15 minutes. You can also add another interval for day conferences when you might want to add a one-hour lunch break from 12:00 to 1:00 and then resume conferences at 1:00 pm.
Sharing the Sign-Up Sheet with Parents, and the Calendar Connection
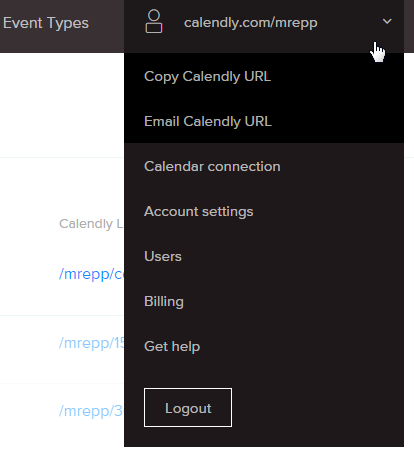
So, how do you share this sign-up schedule with parents? You can share it through a Google Form, through your classroom website, your Google Classroom, or by emailing the parents. Just go up to your account menu in the top right corner (the little head icon) and click once. A pull-down menu appears and you can Email Calendly URL or Copy Calendly URL. The "Email Calendly URL" link opens your Gmail and lets you send the link directly to any parent emails or contact groups you set up in your Gmail Contacts. "Calendar connection," found directly below the email option lets you choose which of your Google Calendars you want to use to schedule your Calendly events. Any parent who picks one of your open time slots will automatically be added to your Google Calendar and that time slot will be used up, leaving only the remaining time slots from which parents can choose. Here are the options under your Account, found in the top right corner menu:
So, how do you share this sign-up schedule with parents? You can share it through a Google Form, through your classroom website, your Google Classroom, or by emailing the parents. Just go up to your account menu in the top right corner (the little head icon) and click once. A pull-down menu appears and you can Email Calendly URL or Copy Calendly URL. The "Email Calendly URL" link opens your Gmail and lets you send the link directly to any parent emails or contact groups you set up in your Gmail Contacts. "Calendar connection," found directly below the email option lets you choose which of your Google Calendars you want to use to schedule your Calendly events. Any parent who picks one of your open time slots will automatically be added to your Google Calendar and that time slot will be used up, leaving only the remaining time slots from which parents can choose. Here are the options under your Account, found in the top right corner menu:
Share your personal Calendly links with parents, students and colleagues. For example, my Conferences link would be https://calendly.com/mrepp/conferences (or) https://calendly.com/mrepp/conferences/11-18-2015 if I want parents to see just that particular date's conference schedule and its currently-open time slots. This is a particularly helpful tip if you just want to show the available slots for one day only.
Parents will pick a time from the list of available slots, and the event is then added to your Google Calendar. Here is an example of a Parent-Teacher Conference event set up in 10-minute blocks.
Parents will pick a time from the list of available slots, and the event is then added to your Google Calendar. Here is an example of a Parent-Teacher Conference event set up in 10-minute blocks.
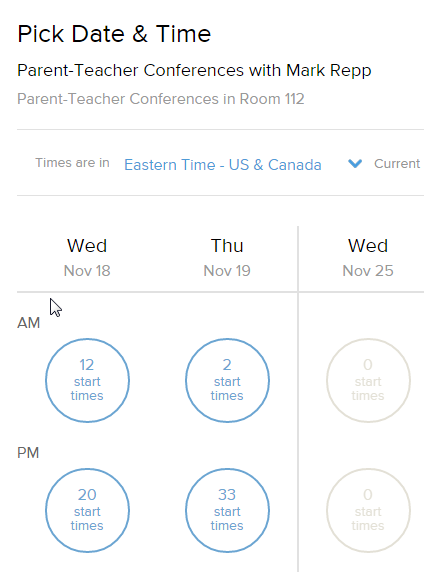
When the parent clicks on your time Start Times circles, this reveals all of your open slots, from which the parent then can click to make an appointment. Here is what they will see:
The Dashboard
The Dashboard is the Home screen that teachers will see when they first open up Calendly and click on their account. This shows all of the current appointments that the teacher has in one concise view. Here is an example:
The Dashboard is the Home screen that teachers will see when they first open up Calendly and click on their account. This shows all of the current appointments that the teacher has in one concise view. Here is an example:
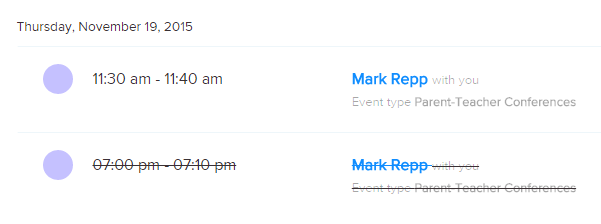
The crossed-out conference was cancelled on the parent's end by clicking the Cancel link within their original e-mail message. Both parents and the teacher can cancel a conference, which then shows up crossed out on the teacher's dashboard and in his/her Google Calendar. This slot remains crossed out until the appointment has been filled by another parent. The Dashboard cannot be seen by anyone except the teacher.
To get additional help, check out the Calendly Knowledge Base which has an extensive Help section on a variety of topics. This excellent YouTube video playlist of Calendly tutorials shows every aspect of the program. Learn how to set up the sign-up form, add custom questions for parents to see (such as a "Your Child's Name" field), set intervals and more. Each video is less than a minute in length and will really help you to get started.
If you need one-on-one or group training, just contact one of our EdTech trainers to set up a session on how to use Calendly to meet your scheduling needs.

 RSS Feed
